

I have a fun do-it-yourself project for you today that you can use for practically any occasion from weddings and bridal showers to engagement dinners and backyard barbeques.

Materials:
1. Fabric: with patterns (make sure fabric design isn’t too busy if you plan to print your graphic on it)
2. Simple cotton canvas fabric (if your fabric design is too busy, you can use this side for your graphic)
3. Fabric Spray Glue or Xyron Machine (with Permanent Adhesive)
4. Scissors (I like to use picking scissors, but straight scissors will do)
5. Ribbon/s
6. Hole Puncher
7. Optional: Eyelets & Eyelet Puncher
8. Iron-on Transfer Sheets for LIGHT fabric (at your local crafts store or Staples)
9. Dinner Napkins
10. Iron
11. Home printer
Let’s get started:
Prep: Create your menu design (there’s an Illustrator and Word template, as well as a JPG of the design I’m using, at the end of this post). Set up your printer to print as a “Mirror Image” (very important, otherwise, it will iron on backwards). Then print your design onto the iron-on transfer using your home printer.

Step 1: Cut both pattern and canvas fabric to a little larger than your desired tag size making sure there’s enough room to trim.
Step 2: Adhere the 2 pieces of fabric together with fabric spray glue. I like to use a Xyron machine (with Permanent Adhesive). Either way works!
Step 3: Iron the fabric to get wrinkles and any extra moisture out.
Step 4: While your fabric is cooling off, trim around the menu design that on the iron-on transfer.

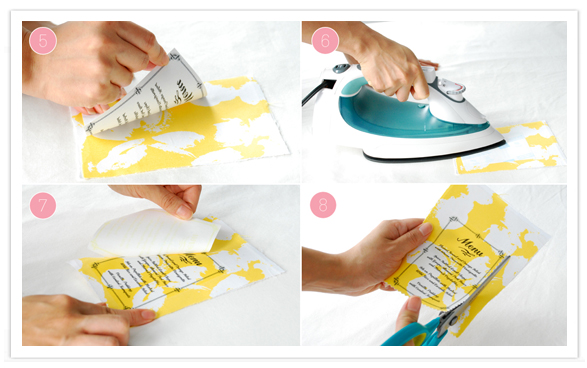
Step 5: Then place the trimmed design (graphic side down) on the desired side of your fabric. Be sure to leave enough room around the sides and top to trim the shape of your tag later on.
Step 6: Iron the graphic for 45-55 seconds with strong pressure.
Step 7: Carefully and slowly peel off the graphic starting from one corner. Make sure to do this while it’s still hot – if it cools down, you might end up with bubbles.
Step 8: Using scissors, trim around the border. Be sure to leave extra height at the top of the Menu for the ribbon and tag shape. I like to do this by hand because I like the rustic feel, but if you want something more exact, you can make a template and trace the shape onto the fabric.

Step 9: To make the slanted sides of the tag, I gently fold the top of the tag in half and cut diagonally (this keeps both sides even).
Step 10: Cut straight across the top of the tag to desired height (if needed).
Step 11: Fold the top of the tag just like you did in “Step 9” and punch a hole about half an inch from the side (it should punch two holes since you folded the tag in half).
Step 12 (optional): I like to add eyelets to finish off the look, but it’s not necessary if you don’t have any eyelets on hand.

Step 13: Place ribbon through holes on each side.
Final Step: Tie around napkin, and Voila! You’re done!
I love using all different fabric patterns, colors, and ribbons – it brings the whole thing to life! The great thing about this project is that you can apply it to practically anything: escort cards, program covers, favor tags – just let your imagination run wild! It’s also a great alternative to expensive printing methods that you can do at home.
Enjoy and happy crafting!!!


